Scrapbooking

Wednesday, July 27, 2011

Birthday card

It's my friend's Birthday so I made her this little card..
 simple enough for a beginner to tackle. 


This 2 sided paper is from Gartner Studios, Bon Voyage - World Map


This paper flower is made with stacked scallop circles all 1.5 inches, sprayed wet and scrunched, un-scrunched and then attached together by a center brad. Once you have the brad in, you can fluff it up as you like and let it dry completely before adding to your layout or card.

Sweet!


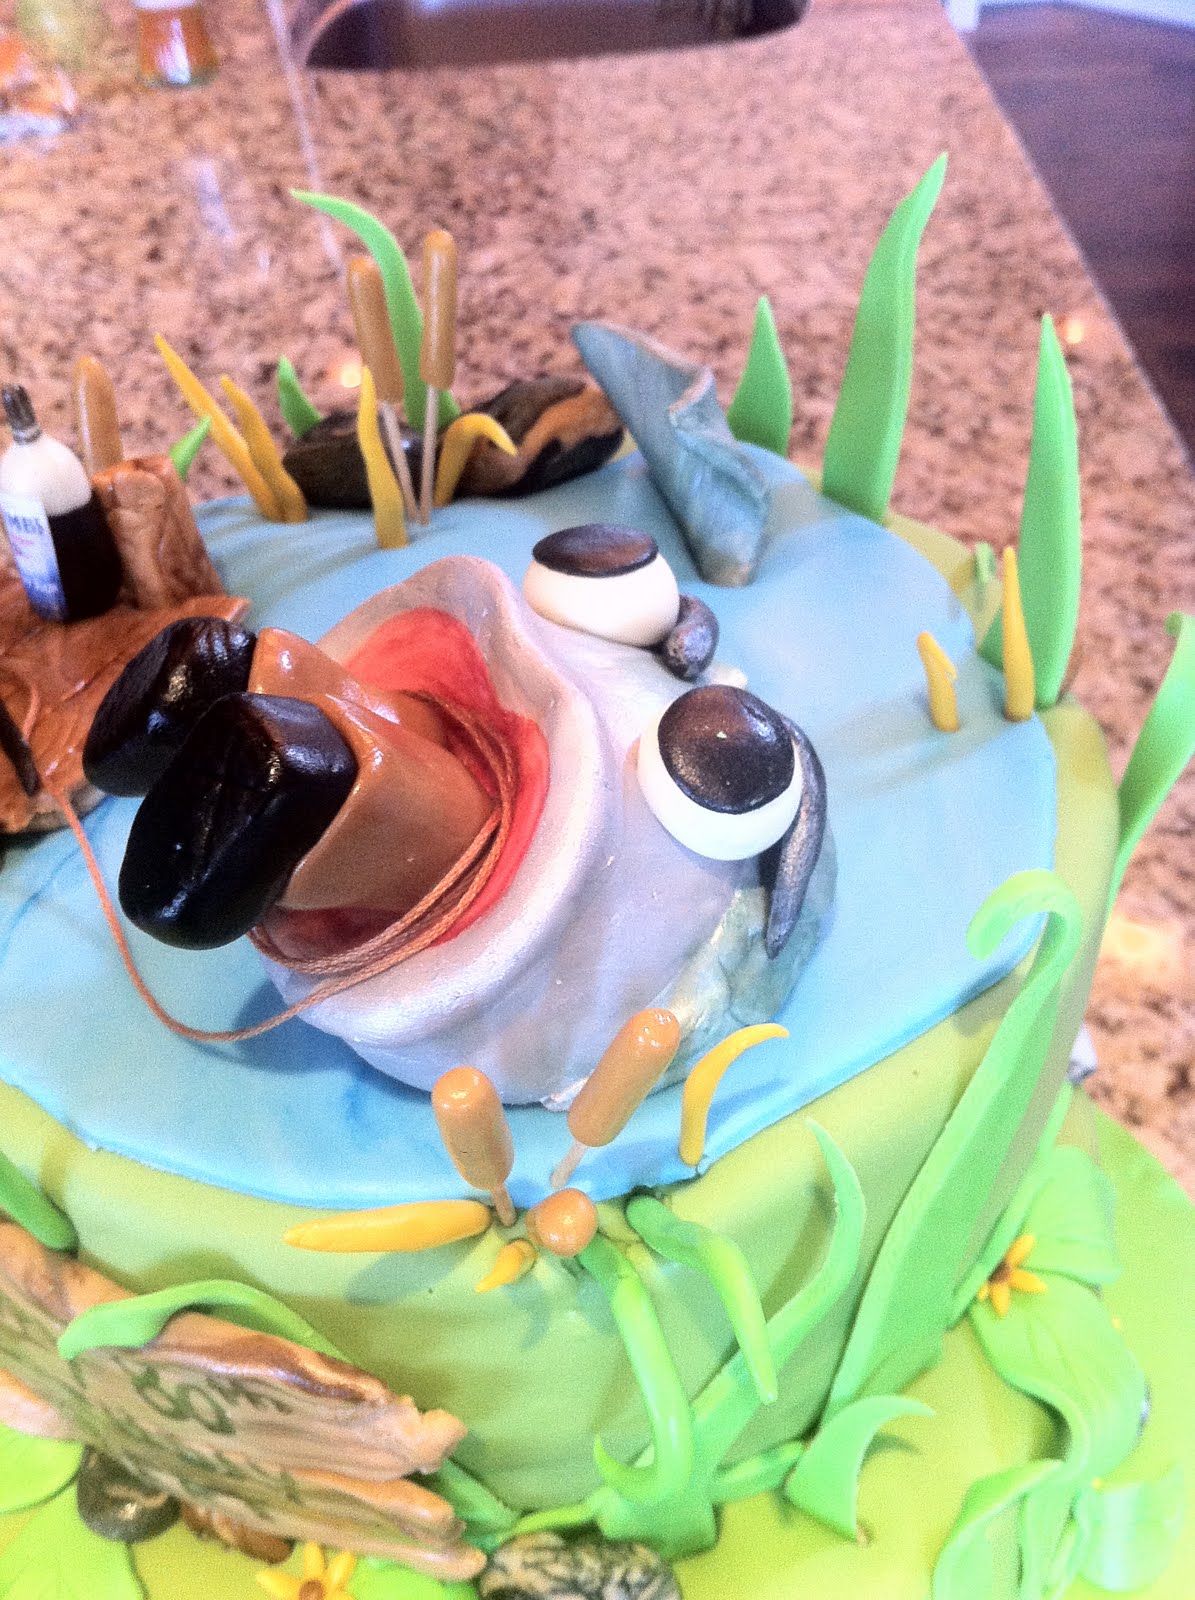
Fondant fishing cake..

Another cake is out of the oven!

These cakes are taking on a life of their own.. I find myself getting more cake request than I expected.
I have a full time job as a parental assistant to three lovely families. This keeps me hopping in the summer for a good ten to twelve hours a day.. So, I told everyone I wouldn't be able to make any cakes till September because each cake is made from scratch, including the frosting, fillings and fondant, then I stack and decorate (this cake came in at 11 hours). Yet, I keep getting cake request (they are all such good friends). After 3 cakes in two weeks it's time to take a break and am hoping to not be persuaded during the month of August as I have other art awaiting my attention.

Anyhoo.. here it is, "It's The BIG One!" For a friend's Father's 80th Birthday.

everything is edible except for a few toothpicks in the cattails and the string

Lamb's navy rum was required, a tiny bottle on dock

Around the side and back

Here fishy, fishy..

Sweet!


Friday, July 22, 2011

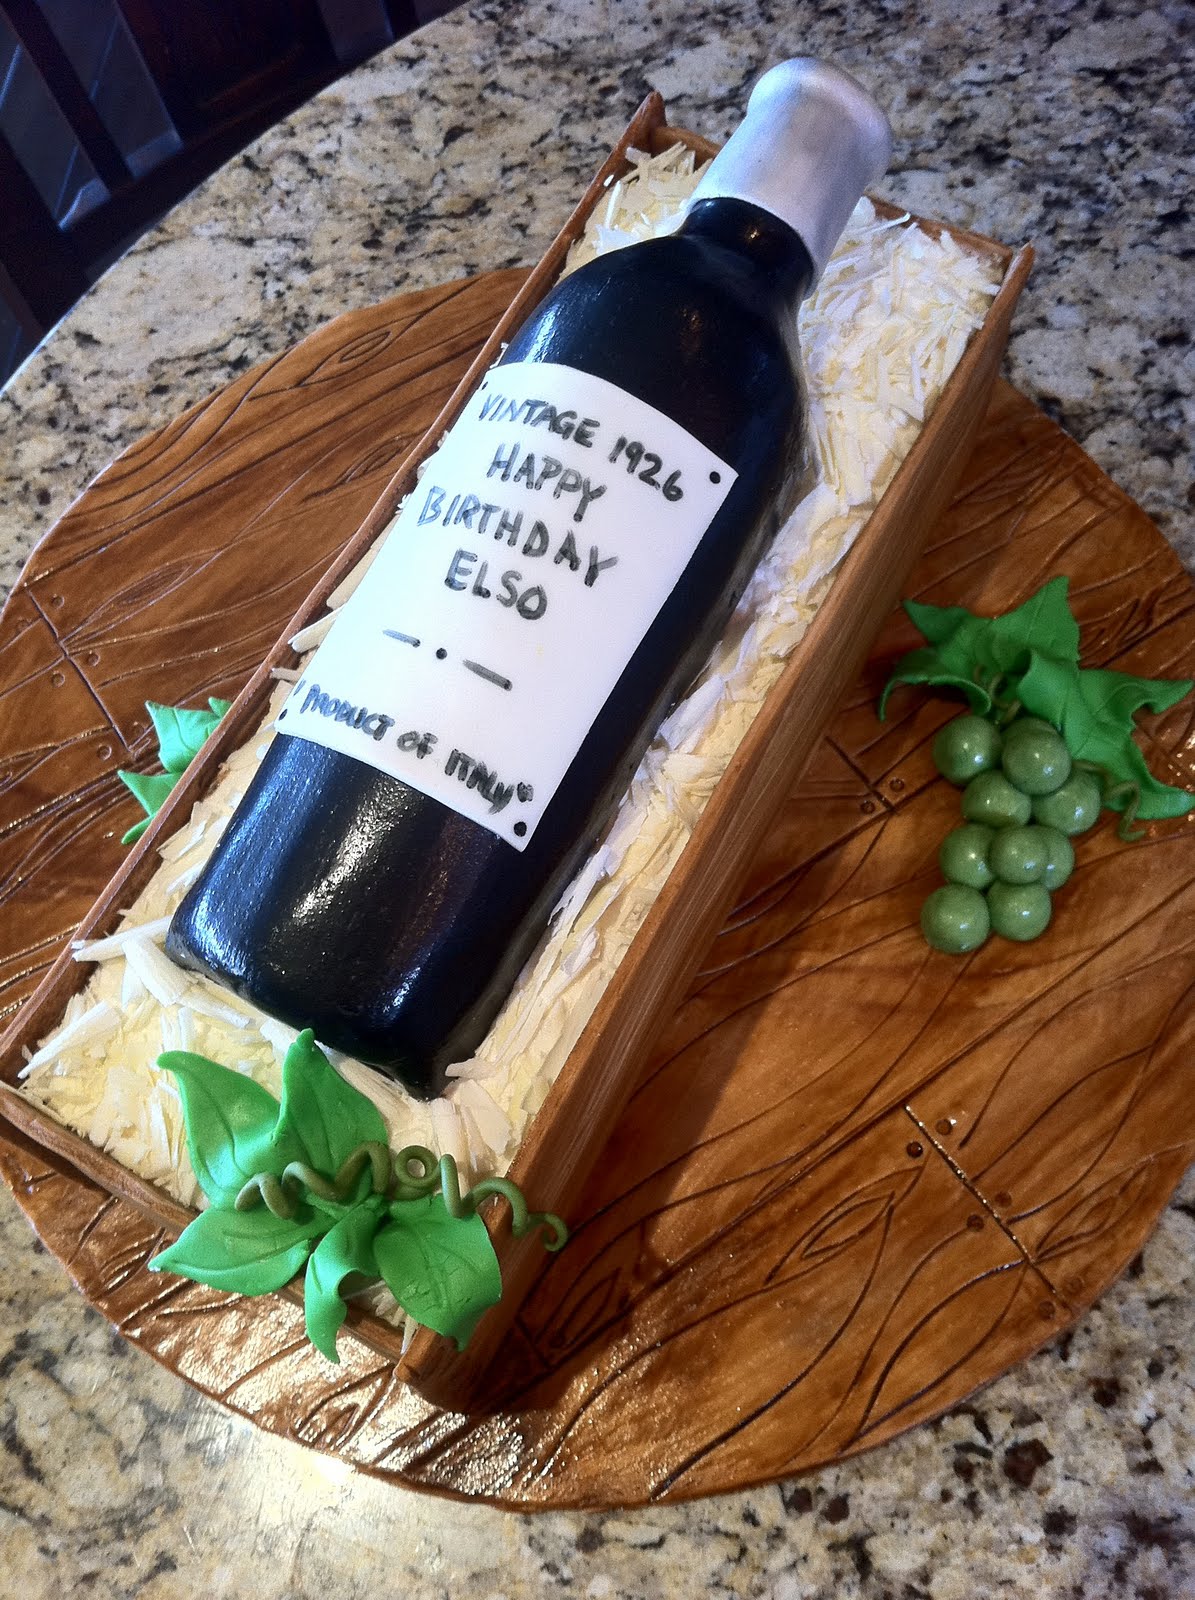
Wine bottle Fondant cake!

I told you there was more cake coming!

It was my father in laws 85th. So, when my husband asked if I could make a cake 4 days before the dinner I got right on thinking about it. I decided because he was born and raised in Northern Italy and to this day, still bottles his own wine, I'd have to do the wine crate cake. I love fondant and the fact that you can make it look like wood, glass.. anything!

Yes, it can look like wood, as I demonstrate in this photo.. this is the cake base. I almost hated to put the cake on it.. it started as a two toned flat sheet of fondant that I drew the lines into and then painted with a darker brown, letting it settle in the grooves. Sort of like antiquing when your faux painting.


Next, the actual cake is made from three loaf pans cut and stacked to get the shape I wanted. Surrounded by more wood fondant and topped with white buttercream, I now have a crate.


This bottle was made with rice treat I cut in circles and stacked, adding a neck. I used silver pearl dust for the neck foil.


I cut the back of the bottle on an angle and inserted a wooden skewer from the top to keep the neck from drooping. The bottle is covered in black fondant, and then painted with a mix of white corn syrup and vodka tinted green.. the green shine catches the light and looks like real glass.. Crazy!

I made the label using an edible marker on white fondant.
The top is covered in white chocolate shavings to mimic packing.

Fondant grapes get a shine from syrup and vodka as well.. the wood base is only brushed with vodka and still shines like it's been polished.


I used a round piping tip to add faux nails in two different sizes.. the base nail is smaller than the crates.
The curly vines are fondant "snakes" wrapped around a dowel and allowed to dry for an hour.

Easy Peasy.


Sweet!

This cake was added to Lil Luna's Link party.

Princess Coaster Mini Album

Another girly album is completed, this one geared towards the Little Princess fans. I have a fondness for Disney and just love to work on Disney albums. I think I'll have to make one of these little coaster albums with a Disney boy theme, but at the moment I've started a Mickey altered journal/scrap/activity book that needs finishing too.

So many papers, so little time. :)

Again, I wanted to play with some charms I started making.. and I have been making most of my own embellishments these days as well. I had features on my Cricut that were not being used enough.. especially those end caps. Now I'm hooked on them and have been using them for page titles. 


I (finally) bought a Sizzix Big Shot for embossing paper.. this one was Tim Holtz "Alterations" 
folder, Dot-Matrix

Cricut end caps in use for titles!

Cute little Cricut flowers and an "end cap" tag..


"Who's the fairest of them all?" mirror charm.

Now that I have the charm thing down I'd love to make some pins, but I'm not shopping this month... guess I can wait till August to try that! 

One more charm...  I love that I can take some beads and tools and make these anywhere.
Even on vacation!


Sweet!

This album was added to the Inspire Me Fridays linky party at Joyful Stamper
and Clean and Scentsible Creative Spark link party.


Sunday, July 10, 2011

Girlz! An itty bitty Coaster album.

So, I have all this girly paper and no girls in my house.

I decided to go ahead and use it up and get a start on some product for an Etsy store that I keep thinking I will start some day.. I always have good intentions and then I get side tracked.

I started with some papers that I thought would appeal to the tween group and tried to make it something that would appeal to the 10 - 13 year old set. I think I got it..

Now that is has a ribbon and a charm, I'll stop messing with it.

Lots of tags!


Of course, if your like me, it's never finished and I decided I should have charms on my albums, so I whipped up one of those too.. I had no idea I could do this but once I started I went crazy. I love how they all turned out.

New ideas to take me away from the laundry!


I won't bore you with all of them.. but they are fun to do! Since this photo, I've made a few more with pink, I'll add the pics on the next blog. Princess mini coaster album coming up..
and.. another cool cake! Yum. 

Album added to Inspire Me Fridays with Joyful Stamper
and Linkin' with Lil' Luna every Wednesday

Jungle Fondant Cake..

So.. I did make a couple of mini albums, but as always... cake interrupts my life.

Cakes make people happy, so I keep making them. This is a hershey's Perfectly Chocolate Cake, such a great tasting chocolate cake, so moist. Easy to stack. I filled and crumb coated with Buttercream Dream a version of buttercream that uses Dream Whip powder to cut the sweetness.. I used marshmallow fondant for a better taste, but have to say I prefer using my other fondant recipe for better handling, but taste won out this time.

This cake was ordered by my hairdresser for her little guy's 1st Birthday.  We bartered hair for cake! Woot!

She asked for monkeys and..well.. it evolved into the jungle. We couldn't stick with one idea so we used 'em all. We took things she liked from a few cakes we saw online and added some of mine and voila!


Sweet!

Thursday, June 2, 2011

From sToRagE RoOm" to CraFt RooM!


Woot! I've been super busy the last two weeks.

First of all I've been doing some specialty props for a local theatre company. I love theatre and have worked backstage in some capacity for years on a few different stages. I've done some stage managing, set building, faux painting, specialty props, special effects, lighting operator, sound.. blah, blah. I love it!

So, I made this lovely chicken (I named her Betsy after my childhood hurricane experience because she is fast like the wind) for a production of Into The Woods. She has to remotely make her way onto the stage where "Jack" steals her from the Giant when he realizes she lays golden eggs.

From the start to the finished hen
Giant's eye glasses
I made her from paper mache and then attached her to a remote car. I gave her a hole with some netting in her bottom to keep her golden egg safe and attainable to Jack.. all in all she was fun to create. I made a few other items as well, including these giant 6 foot wide eye glasses. ----->

With all the props out of the way and my sweet better half (Gord) away for the weekend, I figure I can play in my art/scrap room 
all day Saturday, 
uninterrupted..
but, no.

Instead, I went into my "Art / Scrap Room" which is a gross storage room full of boxes... behind the furnace... that I carved a hole into and added a table. I even refer to it as "The Hole."

Ew.

Did I mention there are no windows? When I went down there, for my day of scrapping, I realized it was a huge creative problem. It's dark. It's not inspiring or pretty or even comfortable. It's ugly and I really don't like going there. So, I decided to tackle it and make it better. I know there are more than a few scrappers in the basement. Hopefully, you can snag some ideas and I'll even post some mechanical instructions in future posts. 

Thirteen hours later and a few instances of "Oh no, what have I done??" moments while moving boxes over to one end and my stuff to the other end, plus getting two big rugs under it all (see scary photos below) I have something I can live with. 


Much later all the boxes
at the end wall. Getting there..
and coffee time!
Every things in the middle, sigh.
Yikes! Where's my table?

Finally shaping up with some DIY closet components

This too, shall come..
I found this unused hutch top in my storage pile

Yay! I can no longer see the furnace.
Ok. Not perfect yet, but soooo much better. Now that it looks like it should be a room, Gord has promised to give me some wall boards.. right now it's just plastic covered insulation. Still border line yukky but it's a work in progress. :)


I can no longer see the boxes
on the end wall..
kid at his new spot :)

I also added some curtains I found packed in some of the boxes I was moving around. With some aircraft cable and turnbuckles to string them up I now have draped walls to hide the junk on the back wall and the furnace on the other end. I even gave my college kid his own desk to use, now he won't clutter mine with his homework and snacks. A little more embellishment organizing and maybe some swag lights to brighten up the space and I'm happy.   

Ok, maybe a fake window is in my future. Thats what I'd do on a stage and I can look at whatever I want to put outside of it... a mountain view, the ocean, a patio, oh my.. yes, unlimited possibilities. <grin>


Hmmm. Creepy.